Thursday, 1 October 2009

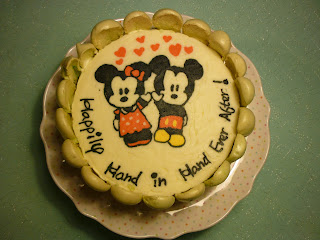
Passionfruit sponge cake with lime meringue fingers, mickey and minnie and with lots of love...

To Y and our parents


Since 4 years ago, this day took a very special place in my heart. I remembered reading a Christian book on the subject of love and relationships many years ago, and one quote particularly struck me: 'If that person is your true love, he/she makes you a better person.' Until I met Y, I couldn't comprehend its true meaning . If I can make a lame analogy, true love to me is like having a duvet surrounding you: it is not something fancy, but it's comfy and warm (without suffocating you). You can live without a duvet; but if you have it, it feels so right and you feel better off with it...

So thank you Y for the many many happy days we have had and are going to have (and cookbooks and bakewares and handbags and clothes and skincare...). I realise I also have to thank our parents for accomodating and sacrificing a lot for us just because they love us. Thank you, parents! We love you!

This cake is again tailor-made. Y loves sponge, hence the sponge; he loves passionfruit, hence the passionfruit curd sandwiched in the middle; he loves meringues and lime, so I improvised and made lime meringue fingers to surround the cake. And lastly, mickey mouse and minnie mouse because we both love them!

P.S. We ate the cake just now and it was gorgeous. This is by far the most satisfied cake I have created so far. The combination of the slightly tangy but fragrant passionfruit pairs very well with the aromatic and crunchy lime meringue. I love it!

Serves 6

For passionfruit filling: (adapted from the passionfruit curd from How to be a domestic goddess by Nigella Lawson)

  1. 5 passionfruit
  2. 1 egg + 1 yolk
  3. 75g caster sugar
  4. 50g unsalted butter
  • Scoop out the flesh of 5 passionfruit and blitz in a food processor. Then use a sieve to filter away the seeds. Keep the juice.
  • Beat the egg, the yolk and the sugar together.
  • Melt the butter in a heavy based pan using a low heat, and when fully melted, stir in the juice and sugar-egg mixture. Keep stirring and keep an eye on the heat. If you think it's going to curdle, take the pan off the heat for a while. You will see the mixture thickens, keep stirring until the mixture is as thick as hollandaise.
  • If you want the curd to have some seeds in it, scoop in an extra passionfruit (both pulp and seeds) into the curd and mix lightly.
  • Pour into a sterilised jar and cool. Can keep in the fridge for a few days, so you can do this in advance.

For sponge: (this is a typical victoria sponge recipe: feel free to use any sponge batter)

  1. 175g self-raising flour
  2. 1 rounded teaspoon baking powder
  3. 3 eggs
  4. 175g margarine
  5. 150g sugar (I used vanilla sugar)
  6. 1/2 teaspoon vanilla extract
  • Pre-heat oven to 180c.
  • Sift the flour and baking powder together.
  • Add all other ingredients and use a whisk to combine the ingredients together. It should be a rather stiff batter.
  • Divide the batter evenly between 2 8inch round tins (lined with baking parchment), and use a spatula to level it out.
  • Bake in oven for 30 mins.
  • Take out the tins from oven and left to cool in their tins for 5 mins. Then peel off the parchment and let it cool for a further 15 minutes.
  • If the sponge is slightly domed (i.e. not level top), use a cake leveller or serrated knife to even it out. You now have 2 sponge layers ready to be sandwiched.

For lime meringue fingers:

  1. 2 egg whites
  2. 100g caster sugar
  3. zest of a lime
  4. green colouring
  • Preheat oven to 150c.
  • Place the whites in a large bowl. Use an electric whisk on a low speed to whisk the whites until they are foamy.
  • Switch to medium speed and continue whisking for about 1 minute.
  • Turn to high speed and add sugar gradually to the whites. Stop when you have a stiff and glossy mixture.
  • Gently fold in the food colouring and lime zest.
  • Use a piping bag with a round tip, to pipe strips of meringue on a lined baking sheet. Allow about 2 cm gap between each each strip. I piped about 25 strips. The length of the strip really depends on the height of the sponge (ideally it should be 1-2 cm higher than the sponge), and in my case, the strips are about 8 cm tall.
  • Pop them in the oven and turn the heat down to 140c immediately and bake for 20 mins.
  • Take it out to cool thoroughly. When they are cool, separate them from the baking sheet carefully.

For buttercream icing: (adapted from Wilton's buttercream icing)

  1. 110g solid vegetable shortening (I used Cookeen)
  2. 110g butter, softened
  3. 1/2 teaspoon of almond extract (you can use any flavour extract, but make sure it's clear in colour, otherwise the icing will be tainted)
  4. 500g icing sugar
  5. 2 tablespoons milk
  6. Colourings
  • Cut the shortening and butter into smallish cubes, and use an electric mixer to beat thoroughly.
  • Add in the almond extract and a little bit of the milk and continue beating.
  • Add in the icing sugar, a little at a time, and scrape the sides of the bowl.
  • If it is too dry, add in a little of the milk. If it is too wet, add icing sugar. You should beat until the icing is mixed thoroughly.
  • Once you make the buttercream icing, cover it with a moist cloth/kitchen paper and store in the fridge for a few days until you need them. If you do make them in advance, make sure you beat it again before you want to use it.
  • To use the buttercream to draw/write: I used a method called 'frozen buttercream transfer'. First, use a pencil to trace the drawing on a parchment paper. E.g. the mickey and minnie were from our tee-shirts, so I used a pencil to trace out the patterns on the tee-shirts over a parchment paper. Second, you don't want to eat the pencil marks so you will have to ice on the other side of the paper. In fact, since the icing will be flipped over onto the cake, the image will be reversed. So apply icing on the un-penciled side of the parchment paper will also help preventing this. Third, get ready the different colour icing and use black buttercream (remember to use a very small tip) to trace out the outline first. Then fill the rest with different colours of buttercream. Fourth, place the parchment into the freezer for about 45 minutes. Don't put it for over an hour though. Fifth, carefully place the parchment (with icing side down) onto the cake and cafefully peel away the parchment. There is now a picture on the cake!

Logistics and assembly:

  1. This is a cake involving many various things but in fact many things can be prepared in advance: the passionfruit curd can keep easily for 1 week in a sterilised jar; the meringue can keep for a week if placed in an airtight container; even the sponge you can make ahead and put in the freezer and thaw when you need them. The buttercream icing can be made in advance too, but the colours and the frozen butter cream transfer method should be done on the day.
  2. To assemble, place one layer of sponge on a cake stand/plate, then spread the passionfruit curd generously on it. Put the second layer of sponge on top. Then spread a thin layer of whipped cream on the top of the cake and dot whipped cream to the sides of the cake (this act as a glue to the meringue fingers). Take out the frozen buttercream icing from the freezer and carefully flip it over on the cake. Lastly, arrange the meringue fingers around the cake.

Friday, 28 August 2009

Icecream Cake

To the glorious British summer


There is no better way to end a summer barbie than having something really cold to alleviate the heat from the sun and the barbie grill. I came up with the idea of making an icecream cake when we had our barbecue 2 weeks ago. It had to be a cake because we had a birthday guest. The icecream cake looked okay, but I made 2 serious misjudgments: (1) I thought it would save effort and time in making an icecream cake rather than baking a proper cake. It turned out to be a 4 hour expedition, waiting for each layer to set while trying to be as swift as possible (as we all know we can't mess with icecream too much or else it will melt). (2) I put digestive biscuit layers in between the icecream layers. The result was a rock-hard-impossible-to-cut icecream cake. In the end, we had to set it aside to let it warm up a little bit and got Y's father to use a Chinese cleaver to forcibly chop it up. Imagine this elegant looking cake being chopped up by a Chinese cleaver! What a brutal crossover! So the following recipe is adapted and the only digestive layer will be the base and this should also considerably shorten the preparation time.

Ingredients:
  1. a tub (500ml) Strawberry icecream
  2. a tub (500ml) Chocolate icecream
  3. 2 tubs (500ml) Vanilla icecream
  4. 120g digestive biscuits
  5. 50g melted butter

Method:

  • Line a 8' inch springform tin with clingfilm. Cover both the base and the sides.
  • Put the biscuits into a plastic bag, tie a knot and use a rolling pin to bash up the biscuits until they resemble fine dust. Combine the dust with melted butter thoroughly and put the mixture onto the base of the tin. Use a spoon or the palm of your hand to press it down to form a base and put it in the fridge to set for 1 hour.
  • Then take out a tub of chocolate icecream and cut out big pieces of icecream to put onto the base. Use a spoon or your fingers to squidge small pieces of icecream to fill the gaps and make sure an even layer is formed. Quickly put it back to the freezer to set for 1 hour.
  • Do the second layer by putting strawberry icecream on top of the chocolate icecream layer, making sure this layer is more or less as thick as the chocolate icecream layer. Again, put it back to the freezer to set.
  • Do the third layer by putting vanilla icecream. Again, set for 1 hour.
  • Release the springform tin and take away the base of the tin by sliding the cake on one plate. Carefully place another plate on top of the cake and turn the cake upside down so that you can remove the clingfilm. Then, place the card board (or your serving plate) on the top and turn the cake upside around again. By now, the cake should be sitting happily on its own bottom. If it is starting to melt, put it back to the freezer for about 15 minutes.
  • Finally, cut thick strips from the vanilla icecream to cover the sides and the top as if you were icing the cake. Use a palette knife to smooth the surface and put it back to the fridge to set for 3 hours.
  • 15 minutes before serving, put the icecream cake in the fridge for 15 mins to soften a little. Slice the cake with a knife that has just been run over hot water.


Tuesday, 4 August 2009

Chocolate Fondant


I am not a chocolate person and I have always felt that I am the only person on this planet who doubt the theraputic effects of chocolate. Until now that is. This beautiful, rich and very chocolatey pudding has managed to bring some warmth to this gloomy day. Since this one is an effective remedy to nearly all kinds of gloominess, I suggest (and this is what I have done here) making some to be put into the freezer, so that this chocolate fondant can come to your rescue in 12 minutes...

Makes 6 7cm diameter(120ml) round ramekins

Ingredients:

  1. 100g dark choclate (again, Valrhona is the best for the job), roughly chopped
  2. 100g butter, roughly diced
  3. 60g caster sugar
  4. 2 eggs + 2 egg yolks
  5. 50g plain flour
  6. 1 teaspoon vanilla extract
  7. 20g butter, melted, for brushing
  8. cocoa powder, for coating
  9. icing sugar, for dusting

Method:

  • Prepare the ramekins by brushing melted butter all over the inside of the ramekins. Then add some cocoa powder into a ramekin and swirl the ramekin so that the cocoa coats the inside of the ramekin. Tap off excess cocoa. Repeat until all ramekins are coated with cocoa (Note: I used Gu dessert glass ramekins - 7cm in diameter and can hold 120ml of liquid. You can use ramekins of other sizes, but the cooking time has to be adjusted.)
  • Put inside a bowl the chocolate pieces and the diced butter and place it over a pan of simmering water, make sure the water is not touching the base of the bowl. Remove the bowl once the butter and chocolate are fully melted. Take out and leave to cool for about 10 minutes.
  • While the chocolate and butter is melting, place sugar, eggs, yolks and vanilla extract in a large bowl and use an electric whisk (on a high speed) to whisk until the mixture has doubled in volume and leaves a trail like a piece of ribbon.
  • Use one hand to pour the chocolate and butter mixture slowly while using the other hand (with a spatula) to fold in the mixture carefully. Sift flour over the mixture and fold again until fully combined. The mixture should resemble a loose cake batter.
  • Divide the mixture between the 6 ramekins (about 80% full). Bake in a preheated oven of 200c for 9-10 minutes.
  • If you are freezing them, cover each with clingfilm and keep in the freezer. When you need them, pre-heat the oven to 200c for 10 minutes and bake for 12 minutes.
  • The puddings should have risen but without any cracks (cracks indicate over-baking and there will be no melting chocolate centre). Leave to cool for 1 minute. Slid a palette knife or a skewer around the edges so that the fondant can be turn out easily. Serve immediately with vanilla icecream.


Thursday, 30 July 2009

Strawberry Charlotte with Mixed Fruits

To Y's Por Por


I have now become the official cake provider to Y's family. Today is the birthday of Y's granny (por por). Por por is the most bubbly, cheerful and welcoming elderly person I have ever met: she likes going out; she likes joking and she likes teasing Y and me every time we visit her! I came up with the idea of making a charlotte because I felt this is the sunniest cake to make for the sunniest granny! This cake, was made on behalf of all her 7 children, hence the word 'mom' on the cake.

As you can see, the ladyfingers (Savoiardi) around the rim look very untidy. I have already tried my best but ladyfingers are delicate little babies that are extremely difficult to make. Next time I think I would use shop bought ones...

(P.S. regarding the last post, I realise one comment has gone missing after I moderated it...dunno why...)

Serves 6-8

Ingredients:
For the ladyfinger biscuits
  1. 4 eggs, separated
  2. 50g + 50g caster sugar
  3. 60g plain flour
  4. 40g cornflour
For the sponge
  1. 175g margarine (I used Stork)
  2. 175g caster sugar
  3. 175g self-raising flour
  4. 3 eggs, beaten
  5. 1 1/2 teaspoon baking powder
For the strawberry mousse
  1. 330g strawberries
  2. 4 tablespoons sugar
  3. 12g gelatine leaves
  4. 300g double cream
  5. 2 tablespoons icing sugar

Method:

  • For this cake, you will need a 8' inch springform cake tin and two 7' inch cake tins.
  • To make the ladyfingers: Preheat the oven to 200c and line 2 baking sheets with parchment paper. You should draw lines on the other side of the parchment paper so that you can pipe uniform ladyfingers (about 4 inch long) easily. Use an electric mixer to beat egg yolks with 50g of sugar until thick and pale yellow in a mixer bowl(about 5 minutes). Transfer the egg yolks and sugar mixture to another bowl and sieve plain flour and cornflour onto the mixture. Do not fold at this stage. Wash the mixer bowl and beaters thoroughly. Then put in the egg whites in the clean, dry mixer bowl and whip on low speed setting until foamy. Use a medium-high setting to whip the whites while add in the remaining 50g of sugar in 3 additions. Whip until stiff peaks form. Pour the whites into the egg yolk and flour mixture, again in 3 additions while folding very lightly. Stop when the batter is just incorporated. DO NOT OVER-FOLD. Put the batter into a piping bag and pipe the batter onto the parchment. Bake for 10 minutes or until the ladyfingers are slightly browned. Take out the baking trays and let cool for 10 minutes. Remove the ladyfingers from the parchment while they are still warm. Let them cool completely on a baking tray.
  • To make the sponge: Preheat oven to 180c. Line 2 7 inch cake tins and line the bottom with parchment paper. In a large bowl, put in margarine, sugar, eggs, flour and baking powder and use a hand whisk until all ingredients are incorporated. Pour the batter into the 2 tins, spreading evenly. Bake for 25 minutes. Cool cakes on wire racks for 10 minutes. Turn out the cakes carefully and use a cake leveler or a serrated knife to trim the top of the sponge slices.
  • To make the strawberry mousse: Soak the gelatine leaf in some cold water for 5 minutes. Whizz the strawberries in a food processor until it becomes puree. In a pan on medium heat, put in the puree and the sugar and let it come to a boil. Remove from heat and add in the softened gelatine (drain the gelatine and discard the water). Stir until the gelatine is dissolved. Leave aside to cool. In another bowl, whip the doublecream and icing sugar until peaks form. Fold the cooled puree mixture into the doublecream.
  • To assemble the cake: Put an 8' inch springform tin (just the ring, not the base) on a cardboard circle. Line parchment paper around the ring (I stapled the ends of parchment paper so that they form a circle around the cake ring). Then, line the ladyfingers carefully around the cake ring. Place one layer of the sponge cake at the bottom, then pour in 1/2 or 2/3 of the strawberry mousse. Put the cake in the fridge to set for 30 minutes. Take out and put on a second layer of sponge cake. Then pour another layer of strawberry mousse on top (you may want to pour all in, but I prefer a thinner layer of mousse on top). Again, put in the fridge to set. Remove the springform ring carefully while the parchment is still holding the cake. Take a big ribbon to tie around the cake while you remove the parchment. Decorate the cake with fruits.

Wednesday, 22 July 2009

Birthday brownies

To the July birthday stars: Alice, Christine, Eric, Jenny, Judy, Sze Wing and Pik To


Happy birthday! With this post you can claim a dozen of brownies from me if you drop by London...hehe...

Adapted from the Hummingbird Bakery Cookbook

Ingredients:
  1. 200g dark chocolate (I used Valrhona 68% dark chocolate)
  2. 175g unsalted butter
  3. 300g caster sugar
  4. 1/2 teaspoon vanilla essence
  5. 120g plain flour
  6. 3 large eggs

Method:

  • Preheat oven to 170c and place a piece of parchment paper on the 33 x 23 x 5 cm baking tray. Grease the sides of the tray.
  • Roughly chop the chocolate and the butter and put in a bowl over a pan of simmering water (be careful: don't let the base of the bowl touch the water) until fully melted. Remove the bowl and let cool.
  • Add sugar to the chocolate mixture and stir well.
  • Sieve in flour and fold until fully incorporated.
  • Finally fold in all the eggs and the vanilla mixture.
  • Pour the brownie mixture on the prepared baking tray and bake for 30 minutes. By then, the top should set but the centre is still soft.
  • Take the whole tray out to cool. Cut into 12 slices when the brownie are still warm. When the brownies are completely cooled, dust with icing sugar to decorate.

Tuesday, 21 July 2009

Labour of Love

I have to admit I don't cook much these days: Y's father is back so is his good food! yoohoo! So, this time I don't have a recipe to share but I can share with you a story of Y and his mistresses. A few months ago, Y has started seeing his mistresses. First thing in the morning he goes out to visit them; first thing when he comes back from work he visits them...and sometimes in the weekend, he visits them once every 2 hours!!! You can see how much TLC (tender loving care) he has put in these beauties... So let me introduce to you the MISTRESSES...

Tomatoes. His favourite mistress, obviously... Not quite ready to eat yet, but seeing them grow in size makes Y very happy. 'Look, it has grown larger today!'

Potatoes. You can just see the green shoots of the potatoes. We tried digging the spuds out last month, but they were like so tiny to be eaten... So we will wait until September.
Spring onions. Still small but they proved very handy two days ago when Y's father forgot to buy spring onions for the lobster noodle...
Sage and rosemary. Still at their baby stages, takes forever to grow...
Basil. Their tender fragrant leaves are sooooo much better than the shop-bought basil plant!


Salad leaves. It was the quickest to grow among all plants we had... We just had 3 little pots, so there was never enough to make a salad...well but as garnish they do their job properly. Sadly they have flowered and look pretty dull now. This is a picture taken when they were first picked...

Friday, 10 July 2009

Golden Prawns


To Y who dubbed this as his no.1 favourite dish

The person who invented this dish is a genius - there is no higher cholesterol food than this (LOL!) But yet, the tastiness of this far surpasses any fear for the cholesterol level, and let's be frank, we are not having this every week or even every month, so I don't think it's gonna harm our health as such.

Ingredients:
  1. 4 very big king prawns
  2. 3 salted duck egg yolks
  3. 1 tablespoon xiaoshing wine
  4. 1 teaspoon salt plus more for washing the prawns
  5. 2 + 2 tablespoons oil
  6. Chopped coriander/spring onion, to garnish

Method:

  • Separate 3 salted duck eggs into whites and yolks. Place the yolks on a shallow dish and steam for about 15 minutes or until fully cooked. Mash the yolks with a fork and leave to cool. The whites can be used in other dishes or add to Chinese soups to enhance flavour.
  • Devein and trim the prawns while keeping the shells intact. Put the prawns under running tap while take some salt in your hand to 'wash' the prawns. Drain and put in a dish. Sprinkle 1 teaspoon of salt to marinate the prawns for 10 minutes.
  • In a hot wok/frying pan, use 2 tablespoons of oil to fry the prawns until they are 80% cooked. Take out the prawns and clean the wok/frying pan.
  • Again, heat up the wok/frying pan and put in 2 tablespoons of oil. Add in the mashed yolks and use a spatula to stir diligently. When the mashed yolks are foaming, add in the prawns and stir for about 1 minute. Then, add wine (pour it around the rim of the wok/frying pan) and stir for another 1 minute. Plate up and garnish with coriander/spring onion.

Wednesday, 1 July 2009

Mini Peach cakes


To Enoch

This, when eaten cold, reminds me of Sara Lee frozen pound cake. I had fond memories of eating Sara Lee pound cake for breakfast when I was little... I am sure my brother has this kind of nostalgia too - he buys Sara Lee for breakfast whenever my parents are holidaying!

Makes 15

Ingredients:
  1. 70g plain flour
  2. 30g cornflour
  3. 4 eggs, separated
  4. 70g +40g sugar
  5. 50g butter, at room temperature
  6. 140g double cream
  7. 1 1/2 tablespoon lemon juice
  8. zest from 1 lemon
  9. peach slices
  10. apricot jam to glaze

Method:

  • Preheat oven to 180c.
  • Mix plain flour and cornflour and sieve for 3 times. Set aside.
  • In a bowl, whisk the 4 egg yolks and 70g of sugar together until pale and thick.
  • Add butter to the bowl and whisk well.
  • Microwave the doublecream for 20 seconds and add it into the bowl together with lemon juice and zest.
  • In a separate bowl (make sure it's squeaky clean), whisk the 4 egg whites and 40g of sugar until stiff peaks form.
  • Fold in the beaten whites with the yolks and flour mixtures. Fold lightly until just combined.
  • Fill fairy cake cases with the mixture.
  • Bake for 20 minutes or until skewer comes out clean. Take out the cakes to cool on wire rack.
  • In the meantime, place a slice of peach on top and brush apricot jam to glaze.

Monday, 22 June 2009

Insalata Caprese - tomato, basil and mozzarella salad


Recently, I have fallen in love with Italian food (thanks to my favourite chef Gorgio Locatelli) and have almost cooked more Italian food than Chinese food! This salad, in my humble opinion, symbolises Italian food - simple ingredients simply prepared/cooked to let the quality of the ingredients shine through the dish. When you come to think of it, the colours of this salad actually resemble colours of the Italian flag!

Since the greatness of this dish depends on how good the ingredients you can get, I would suggest you buy the best possible ingredients you can source. For extra virgin olive oil, I used a Liguria DOP extra virgin olive oil. For balsamic vinegar, I heeded Locatelli's suggestion and looked up the description and list of ingredients on all the vinegar bottles to search for words 'must of grape' and 'aged in wooden barrels' and avoid words like 'caramel' or 'flavourings'. In the end, I bought one which also happened to be the most expensive one in the local Tesco (about £10). A vinegar that costed £10 is admittedly costly, but a little goes a long way. For tomatoes, I bought British Vittoria cherry tomatoes (on the vine) which has an intensely sweet flavour. I took them out of the fridge for 1 hour to get the chill off them and even put them under the sun for half an hour, which according to Nigella Lawson the Domestic Goddess, makes the tomatoes taste more tomatoey.
Serves 1 greedy person or 2 not-so-greedy ppl with substantial main course to follow

Ingredients:
  1. About 12 cherry tomatoes
  2. 1/2 ball of mozzarella (about 60g)
  3. About 15 young basil leaves
  4. Extra virgin olive oil
  5. Balsamic vinegar
  6. Salt
  7. Black pepper
Method:

  • Cut the cherry tomatoes into halves and tear the mozzarella into smallish pieces.
  • Arrange basil leaves, mozzarella and tomatoes on a plate and drizzle with olive oil, balsamic vinegar and season with salt and freshly grinded black pepper. Serve immediately.


Wednesday, 17 June 2009

Mushroom and lemon pasta


Ok, this may not be authentic Italian but this is so refreshingly good, which makes it ideal for a summer alfresco lunch in the garden. Sunny British summer days are short-lived, but eating this, whatever the weather, brings sunshine to me. As a matter of fact, I have been eating this for 2 consecutive lunches and I think I can go on eating this for the rest of the week...
Serves 2
Ingredients:
  1. 200g penne (or any dried pasta)
  2. 40g (about 2 heaped tablespoons) grated Grana Padano cheese/Parmigiano Reggiano/Parmesan cheese
  3. 1 1/2 tablespoon lemon juice
  4. 1 teaspoon lemon zest
  5. 30g butter
  6. 100g mushrooms (I used chestnut mushrooms, but any variety would be fine)

Method:

  • Cook the pasta in boiling salted water according to packet instructions.
  • Meanwhile, slice the mushrooms; grate zest; juice the lemon and grate the cheese.
  • In a small shallow pan, melt 2/3 of the butter on medium heat and saute the mushrooms. When the mushroom is cooked, add salt and pepper to taste.
  • Add in the remaining butter together with lemon juice and lemon zest and cook for 1 minute.
  • When the pasta is cooked, drain the pasta. Reserve about 2 tablespoons of pasta water.
  • Add the pasta to the mushrooms. Then, put in half of the grated cheese and stir through. If the pasta looks dry, add in the pasta water.
  • Serve the pasta sprinkled with the remaining half of the grated cheese.